Docker部署MongoDB4.1基于X.509认证的副本集集群
注意点
- 虽然部署的mongodb的版本是4.1.3,但是它使用的配置和命令都是4.2版本的(→_→)
- 最明显的改变时
ssl的配置和命令都改成了tls
环境
| ip | 端口 | 角色 |
|---|---|---|
| 192.168.43.111 | [27001,27002.27003] | shardsvr |
| 192.168.43.112 | [27001,27002.27003] | shardsvr |
| 192.168.43.113 | [27001,27002.27003] | shardsvr |
| 192.168.43.111 | [27010,27020] | configsvr,mongos |
| 192.168.43.112 | [27010,27020] | configsvr,mongos |
| 192.168.43.113 | [27010,27020] | configsvr,mongos |
建立相关目录和配置文件
执行命令的服务器192.168.43.111,192.168.43.112,192.168.43.113
开启防火墙端口
1 | firewall-cmd --zone=public --add-port=27001/tcp --permanent |
建立临时环境变量
1 | # 副本集mgo01 |
建立目录
1 | 副本集mgo01 |
建立配置文件
shardsvr:mgo01
1
2
3
4
5
6
7
8
9
10
11
12
13
14
15
16
17
18
19
20
21
22
23
24
25
26
27
28
29
30
31
32cat <<EOF> ${mgo01_path}/${conf_dir}/mgo.conf
systemLog:
path: /data/${conf_dir}/log/mgo.log
destination: file
storage:
dbPath: /data/db
journal:
enabled: true
directoryPerDB: true
security:
keyFile: /keyfile/mgo.pem
clusterAuthMode: x509
authorization: enabled
processManagement:
pidFilePath: /data/${conf_dir}/pid/mgo.pid
net:
bindIpAll: true
tls:
CAFile: /keyfile/ca.pem
mode: requireTLS
certificateKeyFile: /keyfile/mgo.pem
replication:
replSetName: ${mgo01_replSetName}
sharding:
clusterRole: shardsvr
EOFshardsvr:mgo02
1
2
3
4
5
6
7
8
9
10
11
12
13
14
15
16
17
18
19
20
21
22
23
24
25
26
27
28
29
30
31
32cat <<EOF> ${mgo02_path}/${conf_dir}/mgo.conf
systemLog:
path: /data/${conf_dir}/log/mgo.log
destination: file
storage:
dbPath: /data/db
journal:
enabled: true
directoryPerDB: true
security:
keyFile: /keyfile/mgo.pem
clusterAuthMode: x509
authorization: enabled
processManagement:
pidFilePath: /data/${conf_dir}/pid/mgo.pid
net:
bindIpAll: true
tls:
CAFile: /keyfile/ca.pem
mode: requireTLS
certificateKeyFile: /keyfile/mgo.pem
replication:
replSetName: ${mgo02_replSetName}
sharding:
clusterRole: shardsvr
EOFshardsvr:mgo03
1
2
3
4
5
6
7
8
9
10
11
12
13
14
15
16
17
18
19
20
21
22
23
24
25
26
27
28
29
30
31
32cat <<EOF> ${mgo03_path}/${conf_dir}/mgo.conf
systemLog:
path: /data/${conf_dir}/log/mgo.log
destination: file
storage:
dbPath: /data/db
journal:
enabled: true
directoryPerDB: true
security:
keyFile: /keyfile/mgo.pem
clusterAuthMode: x509
authorization: enabled
processManagement:
pidFilePath: /data/${conf_dir}/pid/mgo.pid
net:
bindIpAll: true
tls:
CAFile: /keyfile/ca.pem
mode: requireTLS
certificateKeyFile: /keyfile/mgo.pem
replication:
replSetName: ${mgo03_replSetName}
sharding:
clusterRole: shardsvr
EOFconfigsvr
1
2
3
4
5
6
7
8
9
10
11
12
13
14
15
16
17
18
19
20
21
22
23
24
25
26
27
28
29
30
31
32cat <<EOF> ${configsvr_path}/${conf_dir}/mgo.conf
systemLog:
path: /data/${conf_dir}/log/mgo.log
destination: file
storage:
dbPath: /data/db
journal:
enabled: true
directoryPerDB: true
security:
keyFile: /keyfile/mgo.pem
clusterAuthMode: x509
authorization: enabled
replication:
replSetName: ${conf_replSetName}
processManagement:
pidFilePath: /data/${conf_dir}/pid/mgo.pid
net:
bindIpAll: true
tls:
CAFile: /keyfile/ca.pem
mode: requireTLS
certificateKeyFile: /keyfile/mgo.pem
sharding:
clusterRole: configsvr
EOFmongos
1
2
3
4
5
6
7
8
9
10
11
12
13
14
15
16
17
18
19
20
21cat <<EOF> ${mongos_path}/${conf_dir}/mgo.conf
systemLog:
path: /data/${conf_dir}/log/mgo.log
destination: file
processManagement:
pidFilePath: /data/${conf_dir}/pid/mgo.pid
security:
keyFile: /keyfile/mgo.pem
clusterAuthMode: x509
net:
bindIpAll: true
tls:
CAFile: /keyfile/ca.pem
mode: requireTLS
certificateKeyFile: /keyfile/mgo.pem
sharding:
configDB: ${conf_replSetName}/192.168.43.111:27010,192.168.43.112:27010,192.168.43.113:27010
EOFdocker-compose.yml
1
2
3
4
5
6
7
8
9
10
11
12
13
14
15
16
17
18
19
20
21
22
23
24
25
26
27
28
29
30
31
32
33
34
35
36
37
38
39
40
41
42
43
44
45
46
47
48
49
50
51
52
53
54
55cat <<EOF> ${docker_path}/docker-compose.yml
version: '3'
services:
mgo01:
image: mongo:4.1
volumes:
- ${mgo01_path}:/data
- ${keyfile}:/keyfile
- /etc/localtime:/etc/localtime:ro
ports:
- "27001:27018"
command: -f /data/${conf_dir}/mgo.conf
mgo02:
image: mongo:4.1
volumes:
- ${mgo02_path}:/data
- ${keyfile}:/keyfile
- /etc/localtime:/etc/localtime:ro
ports:
- "27002:27018"
command: -f /data/${conf_dir}/mgo.conf
mgo03:
image: mongo:4.1
volumes:
- ${mgo03_path}:/data
- ${keyfile}:/keyfile
ports:
- "27003:27018"
command: -f /data/${conf_dir}/mgo.conf
mgoConfig:
image: mongo:4.1
volumes:
- ${configsvr_path}:/data
- ${keyfile}:/keyfile
- /etc/localtime:/etc/localtime:ro
ports:
- "27010:27019"
command: -f /data/${conf_dir}/mgo.conf
mongos:
image: mongo:4.1
volumes:
- ${mongos_path}:/data
- ${keyfile}:/keyfile
- /etc/localtime:/etc/localtime:ro
ports:
- "27020:27017"
entrypoint:
"mongos"
command:
-f /data/${conf_dir}/mgo.conf
EOF创建x.509证书文件(只要一台服务器执行)
本例使用的是192.168.43.113服务器
1
2
3
4
5
6
7
8
9
10
11
12
13
14
15
16
17
18
19
20
21
22
23
24
25
26
27
28
29
30
31
32
33
34
35
36
37
38
39
40
41
42
43
44
45
46mkdir -p /home/mgo_keyfile
cd /home/mgo_keyfile
openssl req -passout pass:password -new -x509 -keyout ca_p.pem -out ca.pem -subj "/CN=CHC/OU=MGO/O=MongoDB/L=NY/ST=NY/C=CN"
# 192.168.43.111的证书
openssl req -newkey rsa:2048 -nodes -out mgo-111.csr -keyout mgo-111.key -subj '/CN=192.168.43.111/OU=MGO/O=MongoDB/L=NY/ST=NY/C=CN'
openssl x509 -passin pass:password -days 3650 -sha256 -req -in mgo-111.csr -signkey mgo-111.key -CA ca.pem -CAkey ca_p.pem -CAcreateserial -out mgo-111.crt
cat mgo-111.crt mgo-111.key > mgo-111.pem
# 192.168.43.112的证书
openssl req -newkey rsa:2048 -nodes -out mgo-112.csr -keyout mgo-112.key -subj '/CN=192.168.43.112/OU=MGO/O=MongoDB/L=NY/ST=NY/C=CN'
openssl x509 -passin pass:password -days 3650 -sha256 -req -in mgo-112.csr -signkey mgo-112.key -CA ca.pem -CAkey ca_p.pem -CAcreateserial -out mgo-112.crt
cat mgo-112.crt mgo-112.key > mgo-112.pem
# 192.168.43.113的证书
openssl req -newkey rsa:2048 -nodes -out mgo-113.csr -keyout mgo-113.key -subj '/CN=192.168.43.113/OU=MGO/O=MongoDB/L=NY/ST=NY/C=CN'
openssl x509 -passin pass:password -days 3650 -sha256 -req -in mgo-113.csr -signkey mgo-113.key -CA ca.pem -CAkey ca_p.pem -CAcreateserial -out mgo-113.crt
cat mgo-113.crt mgo-113.key > mgo-113.pem
# 创建具有超级管理员权限的客户端证书文件
openssl req -newkey rsa:2048 -nodes -out root.csr -keyout root.key -subj '/CN=ROOT/OU=MGO/O=MongoDB/L=NY/ST=NY/C=CN'
openssl x509 -passin pass:password -sha256 -days 3650 -req -in root.csr -signkey root.key -CA ca.pem -CAkey ca_p.pem -CAcreateserial -nameopt RFC2253 -out root.crt
cat root.crt root.key > root.pem
# 拷贝证书到192.168.43.113的证书目录
cp ca.pem ${keyfile}
cp mgo-113.pem ${keyfile}/mgo.pem
cp root.pem ${keyfile}/root.pem
# 拷贝证书到192.168.43.112的证书目录
scp ca.pem root@192.168.43.112:${keyfile}
scp mgo-112.pem root@192.168.43.112:${keyfile}/mgo.pem
# 拷贝证书到192.168.43.111的证书目录
scp ca.pem root@192.168.43.111:${keyfile}
scp mgo-111.pem root@192.168.43.111:${keyfile}/mgo.pem
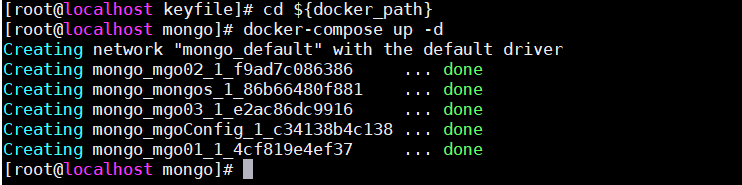
执行docker-compose
1 | cd ${docker_path} |
创建复制集
192.168.43.113
- 创建mgo01复制集
1
2
3进入docker的交互界面
cd ${docker_path}
docker-compose exec mgo01 bash
1
2
3
4连接mongodb
cd /keyfile
mongo --host 192.168.43.111 --port 27001 --tls --tlsCertificateKeyFile root.pem --tlsCAFile ca.pem --authenticationMechanism MONGODB-X509 --authenticationDatabase='$external'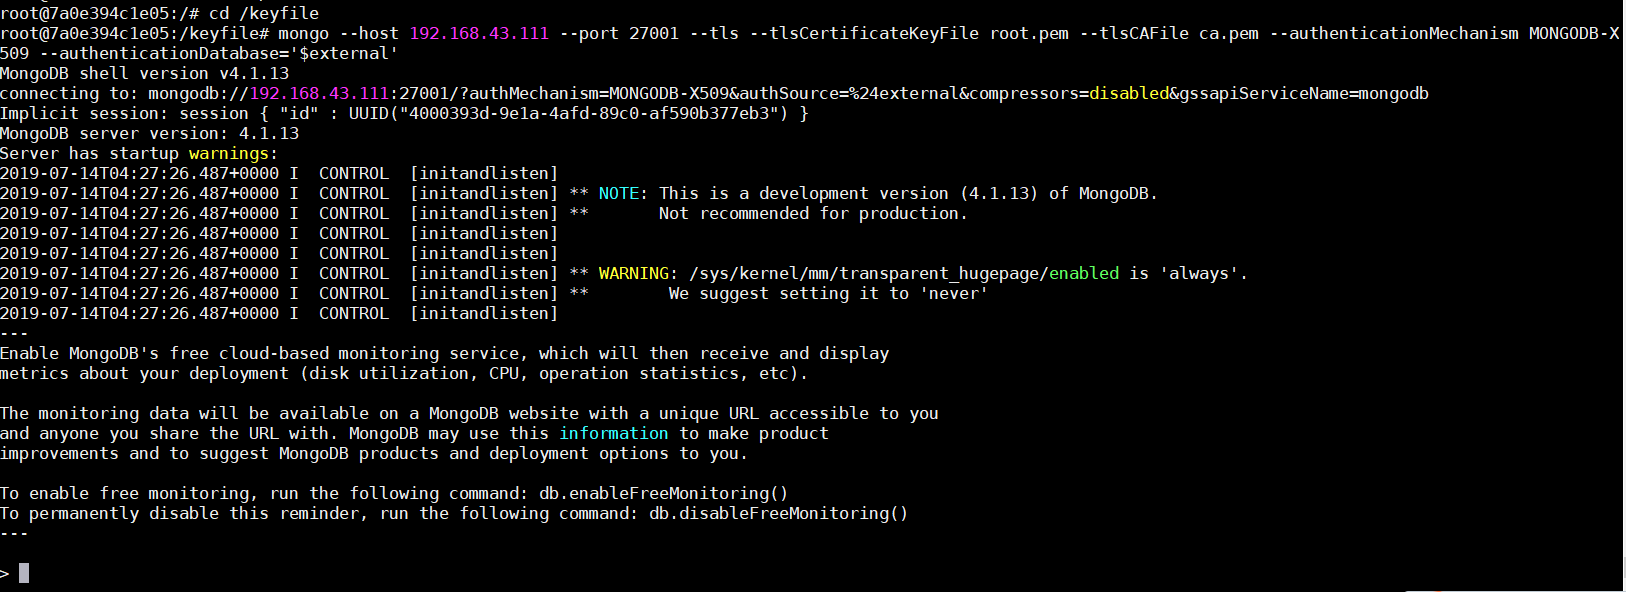
1
2
3
4
5
6
7
8
9
10# 创建mgo01复制集
config = { _id:"mgo01", members:[
{_id:0,host:"192.168.43.111:27001"},
{_id:1,host:"192.168.43.112:27001"},
{_id:2,host:"192.168.43.113:27001"}]
};
rs.initiate(config);
rs.conf();
# 退出mongo shell
exit- 创建mgo02复制集
1
2
3
4
5
6
7
8
9
10
11
12mongo --host 192.168.43.111 --port 27002 --tls --tlsCertificateKeyFile root.pem --tlsCAFile ca.pem --authenticationMechanism MONGODB-X509 --authenticationDatabase='$external'
config = { _id:"mgo02", members:[
{_id:0,host:"192.168.43.111:27002"},
{_id:1,host:"192.168.43.112:27002"},
{_id:2,host:"192.168.43.113:27002"}]
};
rs.initiate(config);
rs.conf();
# 退出mongo shell
exit创建mgo03复制集
1
2
3
4
5
6
7
8
9mongo --host 192.168.43.111 --port 27003 --tls --tlsCertificateKeyFile root.pem --tlsCAFile ca.pem --authenticationMechanism MONGODB-X509 --authenticationDatabase='$external'
config = { _id:"mgo03", members:[
{_id:0,host:"192.168.43.111:27003"},
{_id:1,host:"192.168.43.112:27003"},
{_id:2,host:"192.168.43.113:27003"}]
};
rs.initiate(config);
rs.conf();创建配置服务configsvr
1
2
3
4
5
6
7
8
9
10mongo --host 192.168.43.111 --port 27010 --tls --tlsCertificateKeyFile root.pem --tlsCAFile ca.pem --authenticationMechanism MONGODB-X509 --authenticationDatabase='$external'
config = { _id:"cfgReplSet",configsvr:true,members:[
{_id:0,host:"192.168.43.111:27010"},
{_id:1,host:"192.168.43.112:27010"},
{_id:2,host:"192.168.43.113:27010"}]
};
rs.initiate(config);
rs.conf();
配置仲裁节点或者权重
本例使用的是权重方式
权重
1
2
3
4
5
6
7
8
9
10
11
12
13
14
15
16
17
18
19
20
21
22
23
24
25
26
27
28
29
30
31
32
33
34# 注意配置权重要在PRIMARY节点才可以
# 192.168.43.111
conf = rs.config()
conf.members[0].priority = 3
conf.members[1].priority = 2
conf.members[2].priority = 1
rs.reconfig(conf)
# 192.168.43.112
conf = rs.config()
conf.members[0].priority = 2
conf.members[1].priority = 3
conf.members[2].priority = 1
rs.reconfig(conf)
# 192.168.43.113
conf = rs.config()
conf.members[0].priority = 1
conf.members[1].priority = 2
conf.members[2].priority = 3
rs.reconfig(conf)仲裁节点
1
2
3
4
5
6# mgo01
rs.addArb('192.168.43.114:27001');
# mgo02
rs.addArb('192.168.43.114:27002');
# mgo03
rs.addArb('192.168.43.114:27003');
添加隐藏节点
本例不使用隐藏节点
1
2
3
4
5
6
7
8
9
10
11
12
13
14
15
16
17
18
19
20# mgo01
rs.add('192.168.43.114:27031');
cfg = rs.conf()
cfg.members[5].priority = 0
cfg.members[5].hidden = true
rs.reconfig(cfg)
# mgo02
rs.add('192.168.43.114:27032');
cfg = rs.conf()
cfg.members[5].priority = 0
cfg.members[5].hidden = true
rs.reconfig(cfg)
# mgo01
rs.add('192.168.43.114:27032');
cfg = rs.conf()
cfg.members[5].priority = 0
cfg.members[5].hidden = true
rs.reconfig(cfg)
添加分片
添加分片,不能添加arbiter节点
1
2
3
4
5
6
7
8
9
10
11
12
docker-compose exec mgo01 bash
cd keyfile/
mongo --host 192.168.43.113 --port 27020 --tls --tlsCertificateKeyFile root.pem --tlsCAFile ca.pem --authenticationMechanism MONGODB-X509 --authenticationDatabase='$external'
sh.addShard("mgo01/192.168.43.111:27001,192.168.43.112:27001,192.168.43.113:27001");
sh.addShard("mgo02/192.168.43.111:27002,192.168.43.112:27002,192.168.43.113:27002");
sh.addShard("mgo03/192.168.43.111:27003,192.168.43.112:27003,192.168.43.113:27003");
# 查看配置状态
sh.status()*声明库和表要分片
1
2
3
4
5
6
7mongo --host 192.168.43.113 --port 27020 --tls --tlsCertificateKeyFile root.pem --tlsCAFile ca.pem --authenticationMechanism MONGODB-X509 --authenticationDatabase='$external'
use admin
db.runCommand({enablesharding:"testdb"})
sh.shardCollection( "testdb.books", {id : "hashed" } )
sh.shardCollection( "testdb.books", {id : "hashed" } )测试
1
2
3
4
5
6use testdb
for (var i = 1; i <= 20000; i++){db.books.save({id:i,name:"ttbook",sex:"male",age:27,value:"test"})}
# 查看分片情况
db.books.stats()
sh.status()
创建指定权限的用户
先用root证书的用户在创建一个库
1
2
3
4
5
6
7
8
9
10
11mongos> use dd
switched to db dd
mongos> db.users.insert({"username":"chc","age":20})
WriteResult({ "nInserted" : 1 })
mongos> show dbs
admin 0.000GB
config 0.002GB
dd 0.000GB
testdb 0.001GB
mongos>创建一个只有testdb读写权限的用户
1
2
3
4
5
6
7
8
9
10
11
12
13
14
15
16
17
18
19
20
21
22
23
24
25
26
27
28
29
30
31
32
33
34
35cd /home/mgo_keyfile
# 创建新用户证书
openssl req -newkey rsa:2048 -nodes -out test.csr -keyout test.key -subj '/C=CN/ST=NY/L=NY/O=MongoDB/OU=testdb/CN=CHC'
openssl x509 -passin pass:password -sha256 -days 3650 -req -in test.csr -signkey test.key -CA ca.pem -CAkey ca_p.pem -CAcreateserial -out test.crt -nameopt RFC2253
cat test.crt test.key > test.pem
cp test.pem ${keyfile}
cd ${docker_path}
docker-compose exec mgo01 bash
cd keyfile/
mongo --host 192.168.43.111 --port 27020 --tls --tlsCertificateKeyFile root.pem --tlsCAFile ca.pem --authenticationMechanism MONGODB-X509 --authenticationDatabase='$external'
# 创建用户
db.getSiblingDB("$external").runCommand(
{
createUser: "CN=CHC,OU=testdb,O=MongoDB,L=NY,ST=NY,C=CN",
roles: [
{ role: "readWrite", db: "testdb" },
]
}
)
# 退出
exit
mongo --host 192.168.43.111 --port 27020 --tls --tlsCertificateKeyFile test.pem --tlsCAFile ca.pem --authenticationMechanism MONGODB-X509 --authenticationDatabase='$external'
# 就只能看到testdb
mongos> show dbs
testdb 0.001GB
本博客所有文章除特别声明外,均采用 CC BY-NC-SA 4.0 许可协议。转载请注明来自 Chc-个人数据程序主页!